Having a fairly modest household network, without a single Windows machine in the mix, I find it quite irritating that the “defacto” way to share files in OS X is to use Samba. Nothing against Samba, of course, but I only want to use it if I need to share files with Windows systems. When sharing files amongst my Linux machines, I’ve always chosen NFS. Fortunately, OS X can also use NFS. Unfortunately, it can be a little tricky for the first time user who wants to share files with their other OS X, Linux, or other NFS-exporting systems.
There are two routes that can be taken. The first is to manually edit the NetInfo directory, which can be a little disturbing to those unfamiliar with it, and the second is to use an excellent shareware utility called NFS Manager. NFS Manager is functionally unrestricted if you don’t purchase a license; you just have to deal with a little nagware. But this utility is perhaps the simplest means of adding the ability to automount NFS shares on your OS X client systems.
NFS Manager
Begin by downloading and copying NFS Manager to your {{file|/Applications directory. Once you have done this, open up a terminal to get to the command prompt. In order to use NFS Manager, you must know root’s password. In order to know root’s password, you must have one. By default, OS X does not come with a root password; everything is done via Sudo. However, adding a password for root is extremely simple. If you have administrative privileges on the OS X system, you can execute the following to set root’s password:
$ sudo su -
# passwd root
You will be asked to provide root’s password; I strongly recommend making it a hard one.
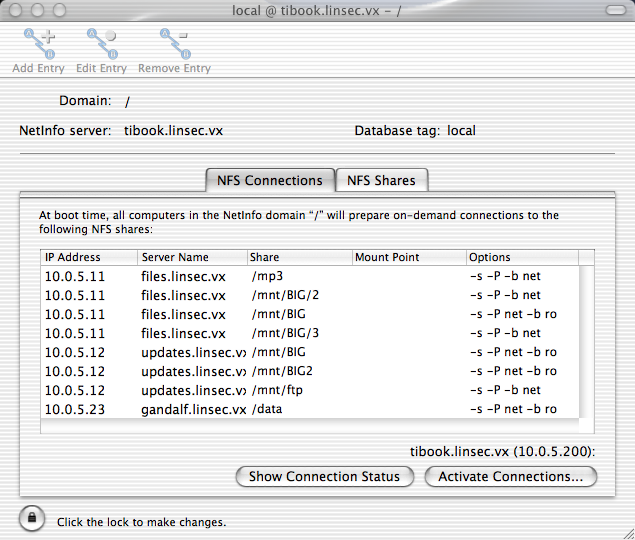
Once this is accomplished, fire up NFS Manager. Before you can make any changes, you need to authenticate yourself. Unlike most OS X apps requiring authentication, NFS Manager wants root’s password, not your own. Once you have provided the password, you can add mounts. You can add, remove, or edit mount points. To add a mount point, click on the “Add Entry” button on the toolbar and fill in the appropriate fields.
The “NFS Server” field is for the FQDN or IP address of the server exporting the NFS mounts. The “NFS Share” is the mount point that the server is exporting. For the options, the defaults are good, however if the client is to have write access to the mounts, you may wish to turn off “Connect as read-only folder”.
Once you’ve added your mounts, you’ll be able to activate your changes, which tells the automounter about your NFS mounts so they can be mounted automatically, as required. The benefit to using the automounter is that if the NFS server isn’t available (you’re away from the network, the machine is turned off, etc.) your system won’t be tied up with hung or stale NFS connections. When hard mounting, if this happens, sometimes the only way you can “fix” the system is by rebooting, or by waiting a few minutes for it to time out. There is really no scenario where a hard mount would be preferred to an auto mount. The other benefit is that automounted shares are only mounted when they are in use; if you aren’t using it, the system unmounts it.
When this is complete, you can point the terminal or the Finder over to /Network/Servers and the NFS server’s name should be listed there. Clicking on the name or changing to that directory will activate the mount and you should be browsing your NFS mounts in no time.
Using NetInfo Manager
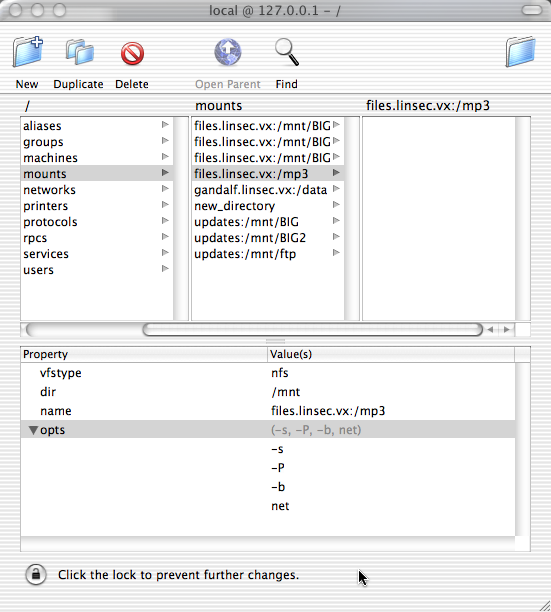
The NetInfo Manager is a GUI tool to administer your NetInfo directory. You can find it in /Applications/Utilities. When you fire up the program, you will need to authenticate as an administrator on the machine by clicking the lock icon at the bottom of the window. The /mounts directory should already exist, so click on it. This is the information the automounter looks at when looking for directories to mount.
Add a new entry by clicking the “New” button on the toolbar. A new entry will appear called “new_directory”. Click on this and then move to the bottom pane in the window. An existing property will be there, the “name” property. Double-click on the value for this property (currently “new_directory”) and change the value to something more meaningful; the NFS share to mount. For example, you could use files.linsec.vx:/mp3 (obviously change this to the NFS share you wish to mount).
Enter the “Directory” menu on the menubar and select “New Property”. You will need to add three new properties, so you may as well create all three now. Moving back to our properties pane, change the properties to “type”, “opts”, and “dir”. You can also use “vfstype” rather than “type” (this is what NFS Manager does).
When you’ve changed the property names accordingly, modify the values for each property. The “type” (or “vfstype”) value should be “nfs”. The “dir” value should be where on the local filesystem you want this share mounted. Finally, for “opts” you can leave it blank, or add some options. Because each option will need it’s own value, you will need to add more values to the property, which can be accomplished by going to the “Directory” menu on the menubar and selecting “New Value”. Add three new values (while having the “opts” property highlighted). Back in the properties pane, make the values “-s”, “-P”, “-b”, and “net”. Each item will have it’s own place in the values for “opts”.
Once you are done with the entry, click on any other directory in NetInfo Manager and you will be asked to save your changes. When you do, you will just need to go to the commandline and send a HUP signal to automount (see Restarting automount below).
Using the Command Line
Finally, you can also configure the client using the NetInfo command line tools. To do this, execute the following commands (substituting the NFS server and path information, of course):
$ sudo nicl . -create /mounts/files.linsec.vx:\\/mp3
$ sudo nicl . -append /mounts/files.linsec.vx:\\/mp3 type nfs
$ sudo nicl . -append /mounts/files.linsec.vx:\\/mp3 opts -s
$ sudo nicl . -append /mounts/files.linsec.vx:\\/mp3 opts -P
$ sudo nicl . -append /mounts/files.linsec.vx:\\/mp3 opts -b
$ sudo nicl . -append /mounts/files.linsec.vx:\\/mp3 opts net
$ sudo nicl . -append /mounts/files.linsec.vx:\\/mp3 dir /private/mp3
These commands do a few things. The first command uses nicl to create the NetInfo entry for the NFS export files.linsec.vx:/mp3 (the server is files.linsec.vx and the mount point is /mp3). NetInfo uses forward slashes to separate path components, so any forward slashes required for our NFS directory must be escaped (with a double back-slash). In other words, if you have an NFS share of /mnt/BIG/2 you would have to write it as \/mnt\/BIG\/2.
The last set of commands set some properties for the entry. The “type” must be set to nfs, the “opts” can be set to whatever you like, but “-s -P -b net” is a good default (change this to “-b ro net” if you want the mount to be read-only). Each value to the “opts” property must be set by it’s own call to nicl. Finally, you must tell NetInfo the “dir”, or local directory where this mount should be mounted (in this case, private/mp3). Note that you do not need to escape forward slashes in the path because this is a value, not part of the NetInfo directory.
Restarting automount
You will need to make automount aware of your changes and this can be done by sending a HUP to the automount process:
$ sudo kill -HUP `cat /var/run/automount.pid`
Final Notes
You can have the local mount point anywhere on the system, it’s entirely up to you. What automount does is make that mount point a symlink to /private/Network/Servers/hostname. The defacto “default” for where these mounts should go is /Network/Servers/hostname, and if you use a directory that isn’t available (ie. doesn’t exist) in your NetInfo directory, it will default to this location (which is as good as any, and flows with the system).
Also, if you wish to see the mount information but don’t feel like firing up NetInfo Manager, you can do so by executing, in a terminal:
$ nidump -r /mounts .
This will give you a rather horrid looking map of the configured mounts, but it’s easy enough to read and understand.
NOTE: It looks as if the “dir” property is ignored in NetInfo, at least for OS X 10.2 (and likely higher). Because some documents make reference to this setting, I believe it is pertinent for older versions of OS X, however in 10.2, everything gets mounted in /Network/Servers/hostname so if you’re looking for the mountpoint you defined and don’t find it, take a look there and you should find it. If you, for whatever reason, require that it be mounted in a certain place (for instance, if you wish to automount /Users), then create a symlink manually pointing to the appropriate directory.
From the three different methods noted for configuring your OS X machine to be an NFS client, I highly recommend using NFS Manager. It makes it extremely easy to configure, and the nagware isn’t that big of a deal considering how little you’ll end up using the software (how many times can you really create NFS mounts?). Even if you’re comfortable with the commandline or modifying NetInfo directly using the GUI, it still takes twice as long to do with Apple’s tools as it does with NFS Manager.