After many years of using Using OpenLDAP for User Authentication, and Using Kerberos 5 for Single Sign-On Authentication, it was time to look at FreeIPA as a way of streamlining everything.
Important Note: You will want to have FreeIPA on it’s own system (whether this is a virtual machine using something like KVM, or dedicated hardware). Making FreeIPA try to place nice with existing services (like Apache, etc) will lead to copious amounts of frustration!
Pre-requisites
This install is done on CentOS 6.3 with IPA 2.2.0 (which is what comes with CentOS 6). The first thing that needs to be done is for the IPA server to be installed on the system that you intend to have as the IPA master:
# yum install ipa-server
This will result in quite a lot of packages being installed, if you did not elect to install the IPA server during the initial system install.
Network Changes
You must also change the network configuration. By default, NetworkManager may be managing the network interfaces. You do not want this! You need to change the networking to not use NetworkManager (and use the regular network service). This can done via:
# chkconfig NetworkManager off; service NetworkManager stop
# chkconfig network on; service network start
Before doing this, you may need to modify /etc/sysconfig/network-scripts/ifcfg-eth0 and change:
NM_CONTROLLED="yes"
to:
NM_CONTROLLED="no"
Finally, edit /etc/hosts and ensure that the IPA server address is listed. This is required for Apache to work properly:
127.0.0.1   localhost localhost.localdomain localhost4 localhost4.localdomain4
::1         localhost localhost.localdomain localhost6 localhost6.localdomain6
192.168.0.10 ipa.linsec.ca ipa
Configuring the IPA Server
The next step is to start the server configuration process. The ipa-server-install program is used to set everything up. It’s interactive, but essentially it configures a stand-alone CA (dogtag) for certificate management, configures ntpd which is important for Kerberos, configures the directory server (which uses the 389 Directory Server rather than OpenLDAP), configures the KDC, and also configures Apache.
The things you will need to know pre-install:
- the fully qualified domain name of the server (example: ipa.linsec.ca; note this must be resolvable forwards and backwards!)
- the Kerberos realm name (example: LINSEC.CA)
- the directory manager password (similar to a root password, but for the Directory Server)
- the IPA server admin password (like the above)
That is all you need to begin with. Below is a transcript of the entire process:
# ipa-server-install

The log file for this installation can be found in /var/log/ipaserver-install.log
==============================================================================
This program will set up the IPA Server.

This includes:
  * Configure a stand-alone CA (dogtag) for certificate management
  * Configure the Network Time Daemon (ntpd)
  * Create and configure an instance of Directory Server
  * Create and configure a Kerberos Key Distribution Center (KDC)
  * Configure Apache (httpd)

To accept the default shown in brackets, press the Enter key.

Enter the fully qualified domain name of the computer
on which you're setting up server software. Using the form
<hostname>.<domainname>
Example: master.example.com.


Server host name [ipa.linsec.ca]:

The domain name has been calculated based on the host name.

Please confirm the domain name [linsec.ca]: linsec.ca

The kerberos protocol requires a Realm name to be defined.
This is typically the domain name converted to uppercase.

Please provide a realm name [LINSEC.CA]: LINSEC.CA
Certain directory server operations require an administrative user.
This user is referred to as the Directory Manager and has full access
to the Directory for system management tasks and will be added to the
instance of directory server created for IPA.
The password must be at least 8 characters long.

Directory Manager password:
Password (confirm):

The IPA server requires an administrative user, named 'admin'.
This user is a regular system account used for IPA server administration.

IPA admin password:
Password (confirm):


The IPA Master Server will be configured with:
Hostname:      ipa.linsec.ca
IP address:    192.168.0.10
Domain name:   linsec.ca
Realm name:    LINSEC.CA

Continue to configure the system with these values? [no]: yes

The following operations may take some minutes to complete.
Please wait until the prompt is returned.

Configuring ntpd
  [1/4]: stopping ntpd
  [2/4]: writing configuration
  [3/4]: configuring ntpd to start on boot
  [4/4]: starting ntpd
done configuring ntpd.
Configuring directory server for the CA: Estimated time 30 seconds
  [1/3]: creating directory server user
  [2/3]: creating directory server instance
  [3/3]: restarting directory server
done configuring pkids.
Configuring certificate server: Estimated time 3 minutes 30 seconds
  [1/18]: creating certificate server user
  [2/18]: creating pki-ca instance
  [3/18]: configuring certificate server instance
  [4/18]: disabling nonces
  [5/18]: creating CA agent PKCS#12 file in /root
  [6/18]: creating RA agent certificate database
  [7/18]: importing CA chain to RA certificate database
  [8/18]: fixing RA database permissions
  [9/18]: setting up signing cert profile
  [10/18]: set up CRL publishing
  [11/18]: set certificate subject base
  [12/18]: enabling Subject Key Identifier
  [13/18]: configuring certificate server to start on boot
  [14/18]: restarting certificate server
  [15/18]: requesting RA certificate from CA
  [16/18]: issuing RA agent certificate
  [17/18]: adding RA agent as a trusted user
  [18/18]: Configure HTTP to proxy connections
done configuring pki-cad.
Configuring directory server: Estimated time 1 minute
  [1/35]: creating directory server user
  [2/35]: creating directory server instance
  [3/35]: adding default schema
  [4/35]: enabling memberof plugin
  [5/35]: enabling referential integrity plugin
  [6/35]: enabling winsync plugin
  [7/35]: configuring replication version plugin
  [8/35]: enabling IPA enrollment plugin
  [9/35]: enabling ldapi
  [10/35]: configuring uniqueness plugin
  [11/35]: configuring uuid plugin
  [12/35]: configuring modrdn plugin
  [13/35]: enabling entryUSN plugin
  [14/35]: configuring lockout plugin
  [15/35]: creating indices
  [16/35]: configuring ssl for ds instance
  [17/35]: configuring certmap.conf
  [18/35]: configure autobind for root
  [19/35]: configure new location for managed entries
  [20/35]: restarting directory server
  [21/35]: adding default layout
  [22/35]: adding delegation layout
  [23/35]: adding replication acis
  [24/35]: creating container for managed entries
  [25/35]: configuring user private groups
  [26/35]: configuring netgroups from hostgroups
  [27/35]: creating default Sudo bind user
  [28/35]: creating default Auto Member layout
  [29/35]: creating default HBAC rule allow_all
  [30/35]: initializing group membership
  [31/35]: adding master entry
  [32/35]: configuring Posix uid/gid generation
  [33/35]: enabling compatibility plugin
  [34/35]: tuning directory server
  [35/35]: configuring directory to start on boot
done configuring dirsrv.
Configuring Kerberos KDC: Estimated time 30 seconds
  [1/10]: adding sasl mappings to the directory
  [2/10]: adding kerberos container to the directory
  [3/10]: configuring KDC
  [4/10]: initialize kerberos container
  [5/10]: adding default ACIs
  [6/10]: creating a keytab for the directory
  [7/10]: creating a keytab for the machine
  [8/10]: adding the password extension to the directory
  [9/10]: starting the KDC
  [10/10]: configuring KDC to start on boot
done configuring krb5kdc.
Configuring kadmin
  [1/2]: starting kadmin
  [2/2]: configuring kadmin to start on boot
done configuring kadmin.
Configuring ipa_memcached
  [1/2]: starting ipa_memcached
  [2/2]: configuring ipa_memcached to start on boot
done configuring ipa_memcached.
Configuring the web interface: Estimated time 1 minute
  [1/14]: disabling mod_ssl in httpd
  [2/14]: setting mod_nss port to 443
  [3/14]: setting mod_nss password file
  [4/14]: enabling mod_nss renegotiate
  [5/14]: adding URL rewriting rules
  [6/14]: configuring httpd
  [7/14]: setting up ssl
  [8/14]: setting up browser autoconfig
  [9/14]: publish CA cert
  [10/14]: creating a keytab for httpd
  [11/14]: clean up any existing httpd ccache
  [12/14]: configuring SELinux for httpd
  [13/14]: restarting httpd
  [14/14]: configuring httpd to start on boot
done configuring httpd.
Applying LDAP updates
Restarting the directory server
Restarting the KDC
Sample zone file for bind has been created in /tmp/sample.zone.QBsBwU.db
Restarting the web server
==============================================================================
Setup complete

Next steps:
    1. You must make sure these network ports are open:
        TCP Ports:
          * 80, 443: HTTP/HTTPS
          * 389, 636: LDAP/LDAPS
          * 88, 464: kerberos
        UDP Ports:
          * 88, 464: kerberos
          * 123: ntp

    2. You can now obtain a kerberos ticket using the command: 'kinit admin'
       This ticket will allow you to use the IPA tools (e.g., ipa user-add)
       and the web user interface.

Be sure to back up the CA certificate stored in /root/cacert.p12
This file is required to create replicas. The password for this
file is the Directory Manager password
#
And that’s all there is to setting it up. Next, there are a few things to clean-up.
Post-installation Configuration
If you have not configured BIND already, notice that during the installation ipa-server-install spit out this notice:
Sample zone file for bind has been created in /tmp/sample.zone.QBsBwU.db
The contents of this file contain:
$ORIGIN linsec.ca.
$TTL    86400
@           IN SOA  linsec.ca. hostmaster.linsec.ca. (
                01      ; serial
                3H      ; refresh
                15M     ; retry
                1W      ; expiry
                1D )        ; minimum

                IN NS           ipa.linsec.ca.
ipa.linsec.ca.      IN A            192.168.250.10
;
; ldap servers
_ldap._tcp      IN SRV 0 100 389    ipa

;kerberos realm
_kerberos       IN TXT LINSEC.CA

; kerberos servers
_kerberos._tcp      IN SRV 0 100 88     ipa
_kerberos._udp      IN SRV 0 100 88     ipa
_kerberos-master._tcp   IN SRV 0 100 88     ipa
_kerberos-master._udp   IN SRV 0 100 88     ipa
_kpasswd._tcp       IN SRV 0 100 464    ipa
_kpasswd._udp       IN SRV 0 100 464    ipa

;ntp server
_ntp._udp       IN SRV 0 100 123    ipa
If you’re not running BIND already, it’s sufficient to use this file alone. If you already have a BIND server setup, you will need to include these LDAP/Kerberos/NTP-related lines in your existing zone file.
Essentially, these are the records that define the services provided by the IPA server so that they can be found via DNS. All the service (SRV) records include the service name (_kerberos) and protocol (tcp) as well as the port (so port 389 for LDAP, 88 for Kerberos, etc.) and then the host that answers (ipa, in this case). BIND must be restarted after either adding this temporary file, or cutting-and-pasting the relevant parts to your own configuration file.
Next, test that you can obtain a Kerberos ticket:
# kinit admin
Password for [email protected]:
# klist
Ticket cache: FILE:/tmp/krb5cc_0
Default principal: [email protected]

Valid starting     Expires            Service principal
12/09/12 14:23:22  12/10/12 14:23:18  krbtgt/[email protected]
If you get output similar to the above, the Kerberos aspect of IPA is working properly. Note that the password you provided during the install for the IPA administrator is the password you would use here. Also note that when you are making any changes to IPA (via the ipa commandline tool), you must have a valid Kerberos ticket.
You must also make sure that these ports are open in your iptables configuration. Edit /etc/sysconfig/iptables and ensure the following is set:
# for IPA
-A INPUT -p tcp -m state --state NEW -m tcp --dport ldap         -j ACCEPT
-A INPUT -p tcp -m state --state NEW -m tcp --dport ldaps        -j ACCEPT
-A INPUT -p tcp -m state --state NEW -m tcp --dport kerberos     -j ACCEPT
-A INPUT -p udp -m state --state NEW -m udp --dport kerberos     -j ACCEPT
-A INPUT -p tcp -m state --state NEW -m tcp --dport kpasswd      -j ACCEPT
-A INPUT -p udp -m state --state NEW -m udp --dport kpasswd      -j ACCEPT
-A INPUT -p udp -m state --state NEW -m udp --dport ntp          -j ACCEPT
-A INPUT -p tcp -m state --state NEW -m tcp --dport http         -j ACCEPT
-A INPUT -p tcp -m state --state NEW -m tcp --dport https        -j ACCEPT
Once you have made the changes, remember to issue service iptables restart.
Adding Users
The next step would be to add users to IPA. This allows you to authenticate against the IPA system — without a user account, you can’t login to a system that uses IPA for authentication.
The ipa tool provides a lot of functionality, one of which is to add users. Because I’m replacing an OpenLDAP directory, I’ve already got some defaults that are in use on my systems, so I want to be able to specify the shell and a specific UID/GID. ipa lets me do so.
# ipa user-add vdanen --first=Vincent --last=Danen --cn="Vincent Danen" \
  --displayname="Vincent Danen" --shell=/bin/zsh --uid=1001 --gid=1001
-------------------
Added user "vdanen"
-------------------
  User login: vdanen
  First name: Vincent
  Last name: Danen
  Full name: Vincent Danen
  Display name: Vincent Danen
  Initials: VD
  Home directory: /home/vdanen
  GECOS field: Vincent Danen
  Login shell: /bin/zsh
  Kerberos principal: [email protected]
  UID: 1001
  GID: 1001
  Password: False
  Kerberos keys available: False
Try `ipa --help` for a list of global options.
# ipa passwd vdanen
New Password:
Enter New Password again to verify:
---------------------------------------
Changed password for "[email protected]"
---------------------------------------
Adding Services
IPA clients are added to the directory by enrolling them. Operating systems that do not have the ipa-client-install program (like OS X), will need to follow the steps in the #Configuring IPA Clients section to enroll properly.
The enrolment only adds hosts, and thus only generates the keytab for the host, which is fine for things like SSH. However, if you want to use mod_auth_kerb or something similar for Kerberos-authenticated HTTP/HTTPS, you will need to add a service. The web UI for IPA 2.2.x is not very good for adding services, so it’s off to the command-line again.
The first thing to do is to SSH into the IPA server, using Kerberos authentication:
$ kinit
[email protected]'s Password:
$ ssh ipa.linsec.ca
$ kinit admin
Password for [email protected]:
Now you are authenticated to IPA as the admin Kerberos principal and can use the ipa program to configure things.
To add an HTTP service, use:
$ ipa service-add HTTP/intranet.linsec.ca
---------------------------------------------
Added service "HTTP/[email protected]"
---------------------------------------------
  Principal: HTTP/[email protected]
  Managed by: thor.linsec.ca
$ ipa-getkeytab -s ipa.linsec.ca -p HTTP/intranet.linsec.ca -k ~/http.keytab
Keytab successfully retrieved and stored in: /home/vdanen/http.keytab
The hostname in question must already be enrolled with IPA, so you will need to use the server’s fully qualified domain name. Once the service is created and the keytab exported, copy the file to the server in question.
This will work for other services as well: LDAP, NFS, etc.
As an aside, there is a fantastic write-up on how to use MediaWiki with FreeIPA: Setting up MediaWiki to run against FreeIPA. I highly recommend this, even if it’s not for setting up a MediaWiki instance (the nice thing with MediaWiki is you can make it use your kerberos credentials). It also details how to create an SSL certificate for a web service, which you can use the IPA CA (DogTag) to manage. By default, the instructions use mod_nss versus mod_ssl, which was a little strange as I’ve never used mod_nss before, but it seems to work quite well.
Configuring IPA Clients
How you configure the IPA clients depends on the client operating system.
Red Hat Enterprise Linux / CentOS
These instructions work for Red Hat Enterprise Linux 5, 6, and 7 (and the equivalent versions of CentOS).
The first thing you need to do is install the ipa-client package:
# yum install ipa-client
Then you need to run the ipa-client-install program:
# ipa-client-install --hostname=foo.linsec.ca
Discovery was successful!
Hostname: foo.linsec.ca
Realm: LINSEC.CA
DNS Domain: linsec.ca
IPA Server: ipa.linsec.ca
BaseDN: dc=linsec,dc=ca

Continue to configure the system with these values? [no]: yes
User authorized to enroll computers: admin
Synchronizing time with KDC...
Password for [email protected]:

Enrolled in IPA realm LINSEC.CA
Created /etc/ipa/default.conf
Configured /etc/sssd/sssd.conf
Configured /etc/krb5.conf for IPA realm LINSEC.CA
Failed to stop the nscd daemon
SSSD enabled
NTP enabled
Client configuration complete.
You can verify the enrolment in the IPA web UI, under Identity, then Hosts. You should see the newly enrolled server here, and if you click on it you should see things like the MAC address, the SSH pubkeys of the server, and whether or not it was setup with a kerberos host.
As well, on the server, you can do:
# ipa host-find foo
--------------
1 host matched
--------------
  Host name: foo.linsec.ca
  Certificate: MIIDjjCCAn[...really long string ...]
  Principal name: host/[email protected]
  MAC address: 00:00:00:0F:B3:B3
  SSH public key fingerprint: E0:B2:14:F1:E3:6B:39:19:DD:2B:9F:B0:23:CE:10:AC (ssh-rsa),
      F0:82:80:D3:DC:48:FF:47:B8:57:A4:7F:50:D3:81:93 (ssh-dss)
  Password: False
  Keytab: True
  Managed by: foo.linsec.ca
  Subject: CN=foo.linsec.ca,O=LINSEC.CA
  Serial Number: 12
  Serial Number (hex): 0xC
  Issuer: CN=Certificate Authority,O=LINSEC.CA
  Not Before: Mon Dec 10 23:13:40 2012 UTC
  Not After: Thu Dec 11 23:13:40 2014 UTC
  Fingerprint (MD5): f2:e0:0c:3e:d0:90:53:92:04:50:da:07:e8:37:e3:27
  Fingerprint (SHA1): 08:8b:27:46:9e:23:54:a6:7a:8e:8a:0b:03:a1:fa:12:f3:96:d5:92
----------------------------
Number of entries returned 1
----------------------------
Fedora
On Fedora 17 and presumably all other Fedora versions with freeipa-ciient available, the setup is quite the same. The primary difference is that the package is called freeipa-client rather than ipa-client:
# yum install freeipa-client
# ipa-client-install --hostname=fedora.linsec.ca
...
Mac OS X 10.7/10.8
Unlike with Fedora or Red Hat Enterprise Linux (and variants), there is no ipa-client-install tool written for OS X, so the process is quite manual and very similar to that outlined in Using Kerberos for Single Sign-On Authentication, except that we will attempt to configure OS X to handle everything that a Linux client would, not just Kerberos.
Kerberos Setup
First, you need to enable Kerberos support, which is done by editing /Library/Preferences/edu.mit.Kerberos, and it should look like:
[domain_realm]
    .linsec.ca = LINSEC.CA
    linsec.ca = LINSEC.CA

[libdefaults]
    default_realm = LINSEC.CA
    allow_weak_crypto = yes
    dns_lookup_realm = true
    dns_lookup_kdc = true
    rdns = false
    ticket_lifetime = 24h
    forwardable = yes
    renewable = true

[realms]
    LINSEC.CA = {
        pkinit_anchors = FILE:/etc/ipa/ca.crt
    }
Next, you need to download the ca.crt from the IPA server:
# sudo su -
# cd /etc/
# mkdir ipa
# cd ipa
# curl -OL http://ipa.linsec.ca/ipa/config/ca.crt
The one thing to note is that you will almost definitely need to set “allow_weak_crypto = yes”, unfortunately. The next step is to edit /etc/pam.d/authorization. This is done instead of editing /etc/authorization as was done in the past. OS X now uses PAM to handle Kerberos authentication, and has the required pam_krb5 module already noted. A working /etc/pam.d/authorization file follows:
# authorization: auth account
auth       optional       pam_krb5.so use_first_pass use_kcminit default_principal
auth       sufficient     pam_krb5.so use_first_pass default_principal
auth       optional       pam_ntlm.so use_first_pass
auth       required       pam_opendirectory.so use_first_pass nullok
account    required       pam_opendirectory.so
This will allow you to kinit on the system and access kerberized services. By adding “default_principal” and calling pam_krb5.so twice you ensure that you get a Kerberos ticket when you log in. Otherwise the system will authenticate against Kerberos with your password, but will not obtain a ticket.
NOTE: there is one really annoying caveat here, as noted in IOWA State University’s Kerberized Login document (or the bug report in particular). If you call kinit from the commandline, the login window will not grant a new ticket on subsequent logins. If you never call kinit from the commandline, then the login window will always obtain the ticket for you. If you do happen to call kinit on the commandline, make sure you also call kdestroy before you log out.
Safari, out of the box, supports kerberos tickets. Google Chrome does support Kerberos tickets, but only if you call it with the —auth-server argument. One simple way to do this is to create an AppleScript that calls Google Chrome appropriately:
$ cat ~/bin/Kerberized-Chrome.applescript
do shell script "open -n -a 'Google Chrome.app' --args --auth-server-whitelist='*linsec.ca' \
  --user-data-dir=/Users/${USER}/Library/Application\\ Support/Google/kerberized"
Firefox can be configured the same on OS X as it is on other platforms, see Configuring Firefox to use Kerberos for details.
IPA Enrollment
Because we cannot enroll the system into IPA the easy way, we need to visit the web UI and add a new host. In the IPA web UI, go the Identity and then the Hosts page. Click the “Add” button, where you will need to add the fully qualified domain name of the host (e.g. mac.linsec.ca), and then click the “Add and Edit” button. You don’t need to add much here, other than the MAC address of the system, and the SSH public keys, which can be found in /etc/ssh_host_dsa_key.pub and /etc/ssh_host_rsa_key.pub. The Ethernet MAC address can be found via either ifconfig or System Preferences.
This, unfortunately, does not generate a keytab file for the host, so on the server, using the ipa-getkeytab program, we will create an obtain the keytab for our new host:
# ipa-getkeytab -s ipa.linsec.ca -p host/mac.linsec.ca -k ~/mac.keytab
Keytab successfully retrieved and stored in: ~/mac.keytab
# ipa host-show mac
  Host name: mac.linsec.ca
  Principal name: host/[email protected]
  MAC address: 00:00:00:AA:1B:14
  SSH public key fingerprint: AF:A6:75:4C:7B:7B:C5:20:8E:C6:81:60:CC:4C:1C:25 (ssh-dss),
    30:19:4E:F5:34:CB:0B:76:24:0E:D0:F9:A3:7D:5E:E2 (ssh-rsa)
  Password: False
  Keytab: True
  Managed by: mac.linsec.ca
The key here is we want to use host/[FQDN] as the kerberos principal.
Incidentally, you can add the host from the command line using ipa host-add as well, but with the web UI you can cut and paste the SSH pubkeys.
Now that the keytab is generated, just copy it from the server to the new workstation and place it in /etc/krb5.keytab. Make sure the file is owned by the user root and group wheel (root:wheel) and is mode 0600.
Directory Utility Setup
This one is a bit of a bear to get right. The FreeIPA documentation on OS X Client Configuration is out-dated (written for OS X 10.4), and the Fedora documentation has absolutely nothing about OS X clients.
As we’ve already seen, setting up OS X is a pretty manual affair and getting the LDAP lookups to work correctly is no different.
To begin, launch Directory Utility. On the Services pane will be three service names: Active Directory, LDAPv3, and NIS. After authenticating (click the padlock), click the “LDAPv3” line to highlight it, then click the little pencil icon to edit.
Click the “New…” button and enter the IPA server name in the “Server Name or IP Address” field. Make sure that “Encrypt using SSL” is unchecked, as well as the “Use for contacts” (you could, optionally, use the LDAP directory for contact information but the point of this particular exercise is for authentication, so at this point turn it off).
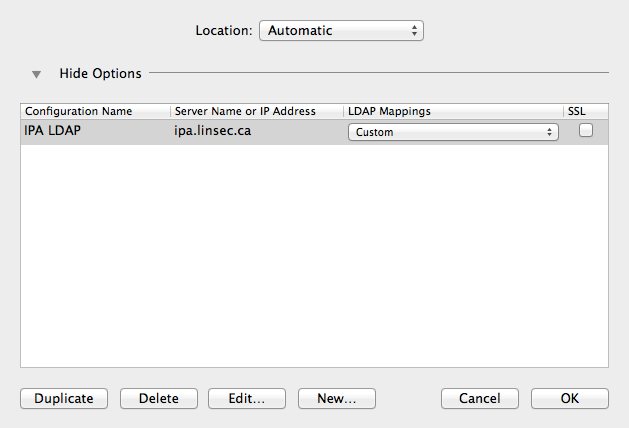
You should be back at the option list. Enter “IPA LDAP” for the configuration name, and select “Custom” for the LDAP Mappings. Make sure the SSL checkbox is not checked. Now highlight the new entry and click the “Edit…” button.
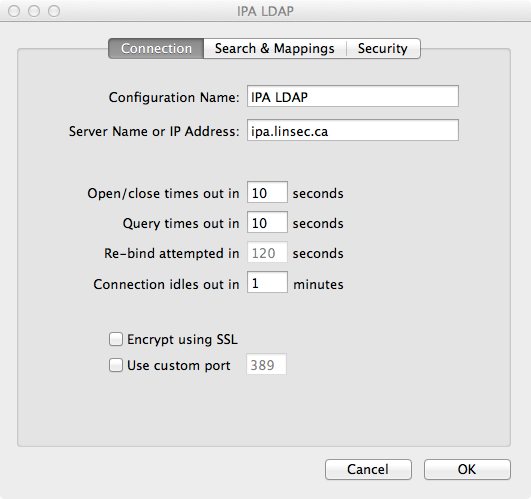
Under the “Connection” tab, change a few of the defaults:
- Open/close times out in 10 seconds
- Query times out in 10 seconds
- Connection idles out in 1 minutes
Unfortunately, at least in OS X 10.8, you cannot change the re-bind attempts timeout from the default of 120 seconds; you can change it in OS X 10.7, so if using that version set it to 10s as well. Also ensure that SSL encryption and the custom port are unchecked.
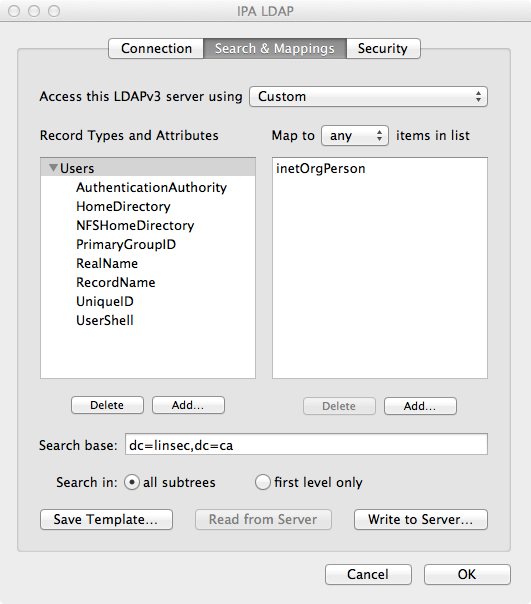
User Mapping
Under the “Search & Mappings” tab, you will need to add a few record types and attributes. In the first pane, click the “Add…” button and add the Record Type of “Users”. This should show up in the first pane, so in the second pane click the “Add…” button and you’ll have an entry field. Type in inetOrgPerson here and press enter or click outside of the edit box.
Now you should be able to define the Search base near the bottom of the window; set it to dc=linsec,dc=ca or whatever the search base might be (e.g. dc=example,dc=com, etc.) and make sure the “all subtrees” radio button is selected.
Click on “Users” in the first pane and then click the “Add…” button. We will be adding a number of Attribute Types and setting the associated map, similar to how we mapped “Users” to “inetOrgPerson”. The Attribute Types and their respective values are noted below:
- AuthenticationAuthority: uid
- HomeDirectory: #/Users/$uid$
- NFSHomeDirectory: #/Users/$uid$ (NOTE: odd as it sounds, this seems to be required, even if you’re not using NFS)
- PrimaryGroupID: gidNumber
- RealName: cn
- RecordName: uid
- UniqueID: uidNumber
- UserShell: loginShell
For the above you, you have a choice for the HomeDirectory and NFSHomeDirectory options. If you use homeDirectory for both, it will map to /home/[user] which is fine for automounted home directories (/home/ is an automount on OS X). However, if you want a local directory on the machine for the user (not an automounted/shared home directory), use #/Users/$uid$ instead.
Once this is done, click the “OK” button to save and return to the server list. Click “OK” again and head to the Search Policy pane. In the “Authentication” page, click the “+” button and add your new LDAP server definition (e.g. “/LDAPv3/ipa.linsec.ca”). It will show up after the “/Local/Default” domain. Make sure that the “Search” field is set to “Custom path”.
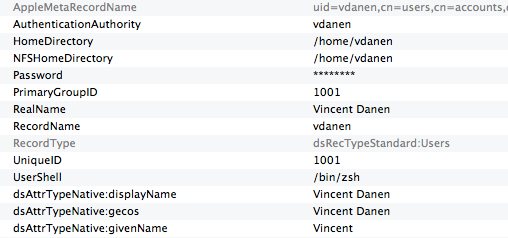
Now move to the Directory Editor pane. If everything is setup correctly, you should see a list of users pulled from the IPA server’s LDAP directory on the right. If you click one of the user names, you should see a pane full of name and value pairs, which is what OS X is mapping locally from the directory server. The items in grey are the static bits that OS X generates, and the names starting with “dsAttrTypeNative:” are the un-mapped bits from the LDAP directory. You should see quite a few of them, including kerberos principal name, password policy references, the “dsAttrTypeNative:ipaUniqueID”, and so on. More importantly, you should see at the top various bits that are being mapped properly.
To see the results of your changes without rebooting, go to the Terminal and use dscacheutil to empty the cache which will allow it to pick up the changes:
$ dscacheutil -flushcache
Next, use dscacheutil to do a lookup to make sure that the user is actually found:
$ dscacheutil -q user -a name vdanen
name: vdanen
password: ********
uid: 1001
gid: 1001
dir: /Users/vdanen
shell: /bin/zsh
gecos: Vincent Danen
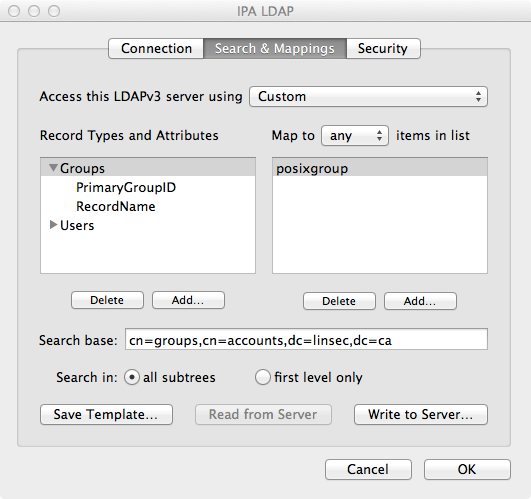
Group Mapping
Now that the user information is present, the last step is to setup the groups (from the above, you can see that the group names are missing). Once again, in Directory Utility you want to go to the “Search & Mappings” pane and this time add a “Groups” record type, which should map to “posixgroup”. There are only a few attributes to add under the Groups record type:
- PrimaryGroupID: gidNumber
- RecordName: cn
As with the Users record type, you will need to set the search base for groups. Click the “Groups” record type and use cn=groups,cn=accounts,dc=linsec,dc=ca for the search base.
Click “OK” to save. You can now go to the “Directory Editor” and select “Groups” from the “Viewing” pulldown menu and you should see all of the groups from your directory, just as you did for the users. Should also see a lot of information in the Name/Value screen showing that the groups were properly found.
Once again, head back to the Terminal, flush the cache, and do a lookup:
$ dscacheutil -flushcache
$ dscacheutil -q group -a name vdanen
name: vdanen
password: *
gid: 1001
$ id vdanen
uid=1001(vdanen) gid=1001(vdanen) groups=1001(vdanen),402(com.apple.sharepoint.group.1),12(everyone),62(netaccounts)
Creating Home Directories
If you elected to have the home directory on the local system (using /Users/[user]), you have one further step to make. OS X does not auto-create home directories for LDAP-based users, so you will need to create them yourself. All you need to do is create the directory, upon first login, the rest will be populated:
$ sudo su -
# mkdir /Users/vdanen
# chown vdanen:vdanen /Users/vdanen
The default group for local OS X users is staff which is not used with IPA. So for remote users, you will want to use the user’s group and private group as defined in IPA (usually the same name, like vdanen:vdanen). So home directories, when created, will propagate group ownership; if you create the home directory as [user]:staff then all files beneath it will be owned [user]:staff; if you create it [user]:[group], then all files beneath the home directory will be created with the same ownership.
So, when creating the home directory use chown vdanen:vdanen (or [user]:[group]) and then all files created beneath the directory will have the correct ownership.
System Preferences: Login
Finally, make a trip to System Preferences, in particular the Users & Groups settings. Click the “Login Options”. Here you will want to ensure that the following are set:
- Display login window as: Name and password (otherwise network users cannot login)
- Allow network users to log in at login window (checked, you can restrict to certain users by clicking “Options…”
- Network Account Server is set and has a green light (should display the IPA server’s hostname)
Setting up Kerberized NFSv4 Server
Setting up file sharing with NFSv4 is quite straightforward. On the IPA server, you need to create a service entry and generate a keytab for the NFSv4 server:
# kinit admin
Password for [email protected]:
[root@ipa .ssh]# ipa service-add nfs/nfs.linsec.ca
--------------------------------------------
Added service "nfs/[email protected]"
--------------------------------------------
  Principal: nfs/[email protected]
  Managed by: nfs.linsec.ca
[root@ipa .ssh]# ipa-getkeytab -s ipa.linsec.ca -p nfs/nfs.linsec.ca -k ~/nfs.keytab
Keytab successfully retrieved and stored in: /root/nfs.keytab
Copy this new keytab to the actual NFSv4 server and add it to the host keytab:
# (echo rkt ~/nfs.keytab ; echo wkt /etc/krb5.keytab) | ktutil
# klist -k /etc/krb5.keytab
The klist output should show both host and nfs entries for the system.
Configuring a Fedora/Red Hat Enterprise Linux/CentOS Server
If the server in question is running Fedora, Red Hat Enterprise Linux, or CentOS (and similar operating systems, edit /etc/sysconfig/nfs and set:
SECURE_NFS="yes"
Create the /etc/exports file to contain:
/export *(rw,sec=sys:krb5:krb5i:krb5p,fsid=0)
/export/users *(rw,sec=sys:krb5:krb5i:krb5p,nohide)
And create the /export directory. In this example, we’re going to make the /srv/userfiles directory available as /export/users:
# mkdir -p /export/users
# chmod 1777 /export
# mount --bind /srv/userfiles /export/users
# echo "/srv/userfiles     /export/users       none    bind        0 0" >>/etc/fstab
(The last command is to make this persist across reboots via /etc/fstab). Configuring other aspects of the NFSv4 server is beyond the scope of this article; there are lots of docs about setting up an NFS server, including the article I wrote for TechRepublic: Kerberos Authentication with NFSv4 or a general NFSv4 setup guide from the Archlinux wiki. Finally, start (or restart) the NFS service:
# service nfs restart
Configuring a Fedora/Red Hat Enterprise Linux/CentOS Client
If the client system has not yet been enrolled with IPA, do that first. Once that is done, simply edit /etc/sysconfig/nfs and set:
SECURE_NFS="yes"
Then start the appropriate services:
# service rpcgssd start
# service rpcbind start
# service rpcidmapd start
Then, to see what exports are available from the NFS server:
# showmount -e nfs.linsec.ca:
/export/users *
/export       *
Finally, to have the NFS directory mounted at boot, add to /etc/fstab
nfs.linsec.ca:/ /mnt/nfs nfs4 sec=krb5i,rw,proto=tcp,port=2049
Setting up a Kerberized AFP Server
The AFP (Apple Filer Protocol) server will typically only be used by OS X clients. While using NFSv4 is arguably better, AFP is easier to setup on both the client and the server. First, install the netatalk package (this assumes you are setting up the AFP server on Linux):
# yum install netatalk
Next, create the service entry and obtain a service ticket. For this example, we’re going to assume that the server is also nfs.linsec.ca, so this will be providing both NFSv4 and AFP services.
# kinit admin
Password for [email protected]:
[root@ipa .ssh]# ipa service-add afpserver/nfs.linsec.ca
--------------------------------------------
Added service "afpserver/[email protected]"
--------------------------------------------
  Principal: afpserver/[email protected]
  Managed by: nfs.linsec.ca
[root@ipa .ssh]# ipa-getkeytab -s ipa.linsec.ca -p afpserver/nfs.linsec.ca -k ~/afp.keytab
Keytab successfully retrieved and stored in: /root/afp.keytab
Copy the keytab to the server and store it in /etc/netatalk/. Next, edit /etc/netatalk/afpd.conf and add the following to the bottom (on one line, wrapped for readability):
- -tcp -uamlist uams_gss.so -k5service afpserver -k5realm LINSEC.CA
  -k5keytab /etc/netatalk/krb5.keytab  -fqdn nfs.linsec.ca:548
This tells afpd to use TCP-only, to use GSSAPI for authentication, provides the kerberos service name (afpserver), the kerberos realm (LINSEC.CA), the location of the keytab, and the fully qualified domain name of the server, and the port that afpd is listening to.
Configure your /etc/netatalk/AppleVolumes.default to suit and (re)start the netatalk service.
Browser Configuration
Firefox
For the Firefox web browser, if you set network.negotiate-auth.trusted-uris to the domain, as per the documentation, it will work — on Linux. On OS X it does not; you must also tell Firefox to allow for delegation. This means you will also need to set network.negotiate-auth.using-native-gsslib and network.negotiate-auth.delegation-uris, so it will look like:
network.negotiate-auth.delegation-uris: .linsec.ca
network.negotiate-auth.gsslib: true
network.negotiate-auth.trusted-uris: .linsec.ca
These can be set in the about:config settings of the browser.
Google Chrome / Chromium
Note: prior to Chrome 101; the Allowlist noted below was Whitelist.
Out of the box, Google Chrome must be told about any kerberos authentication and unfortunately it isn’t exposed via the settings in the browser. You will need to add some command-line options to Chrome (or Chromium) in order for this to work. Using —auth-server-allowlist will work for most kerberos-enabled sites, however it will not properly authenticate against the IPA web service itself because it does not perform delegation. In that case you will also need to add —auth-negotiate-delegate-allowlist. For example, to write an AppleScript that will launch Chrome appropriately, use something like the following:
do shell script "open -n -a 'Google Chrome.app' --args --auth-server-allowlist='*.linsec.ca' --auth-negotiate-delegate-allowlist='*.linsec.ca'; echo"
And on Linux you can use a shellscript like the following:
#!/bin/sh
/usr/bin/google-chrome "--auth-serverallowlist=*.linsec.ca"
An alternative to the above is to configure the preference files to make the settings permanent. On Linux, this is the /etc/opt/chrome/policies/managed/organization-corp.json with the following contents:
{ "AuthServerAllowlist": "*.linsec.ca",
"AuthNegotiateDelegateAllowlist": "*.linsec.ca" }
On OS X, you need to edit the ~/Library/Preferences/com.google.Chrome.plist file (it will be created after Google Chrome first runs). By default it’s a binary plist, so the easiest way to edit it is to use the defaults program:
$ defaults write com.google.Chrome AuthServerAllowlist "*.linsec.ca"
$ defaults write com.google.Chrome AuthNegotiateDelegateAllowlist "*.linsec.ca"
If you are using the Chromium browser, you would use org.chromium.Chromium instead.
To see whether or not the configuration worked, you can look at the about:policy page in the web browser.
Safari
At this time, at least with Safari 6.0.4, it does not look like it supports delegation. So while Safari may work transparently with some kerberos-authenticated sites, for any sites that require delegation, Safari will not work (this includes the IPA web interface). Safari does work, when the host operating system is properly configured, with web interfaces that do not require delegation (for instance, it may work with a site using Apache’s mod_auth_kerb (such as MediaWiki), but will not with IPA).
References
- Fedora 17 FreeIPA Installation Guide
- Logging in to Mac OS X using Kerberos and LDAP (useful guide, but only to OS X 10.7)
- Setting up MediaWiki to run against FreeIPA (also details generating and using SSL certs with mod_nss and the IPA Certificate Authority)
- Kerberos Authentication with NFSv4
Revision History
- 05/16/2022 - update Chrome’s kerberos key names
- 12/04/2015 - using ‘defaults write’ is easier than editing plist files on OS X
- 06/23/2013 - permanent configuration files in Chrome/Chromium
- 05/30/2013 - add information on how to properly setup Chrome and Firefox
- 12/18/2012 - setting up a kerberized netatalk server on linux
- 12/15/2012 - add information on nfs client/server setup for linux
- 12/13/2012 - add information on group lookups on OS X, note how to obtain kerberos ticket at login on OS X
- 12/11/2012 - Initial article